Trading Module Interpreter
This quick-start guide takes only 13–15 minutes to follow. Take a moment to absorb the revolutionary yet intuitive concept behind our technology. You’ll see how it works: within minutes, you’ll be able to design and deploy high-quality automated trading systems with ease.
Function principle
The Trading Module Interpreter represents a revolutionary approach to algorithmic trading on MetaTrader 4 and MetaTrader 5 platforms. At its core, this sophisticated runtime environment transforms your trading ideas into automated strategies without requiring any programming knowledge.
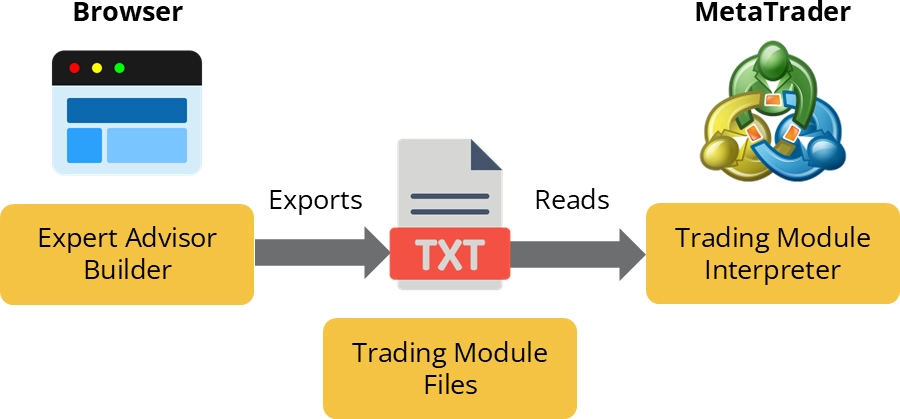
The entire workflow consists of three simple components working in perfect harmony:
- Expert Advisor Builder (Web Application): Access our intuitive web application directly from your browser. Here, you'll design your trading logic using a visual interface. Each trading module you create represents a complete, self-contained trading strategy.
- Trading Modules (Text Files): Your strategies are exported as simple text files containing all the parameters and logic needed for execution. These modules are completely transparent, every aspect of your strategy is visible and editable. No hidden components or black-box algorithms.
- Trading Module Interpreter (MetaTrader Runtime): This powerful application runs within MetaTrader, reading your trading modules and executing trades according to your defined logic. It seamlessly integrates with both MT4 and MT5, providing professional-grade execution capabilities. Modules can be added, removed, or modified dynamically at runtime.
The beauty of this system lies in its simplicity and transparency. You can create complex multi-timeframe strategies, implement sophisticated risk management, and utilize advanced technical indicators, all through an intuitive visual interface. Each module operates independently, allowing you to run multiple strategies simultaneously without interference.
Visit our Expert Advisor Builder web application to start building immediately.
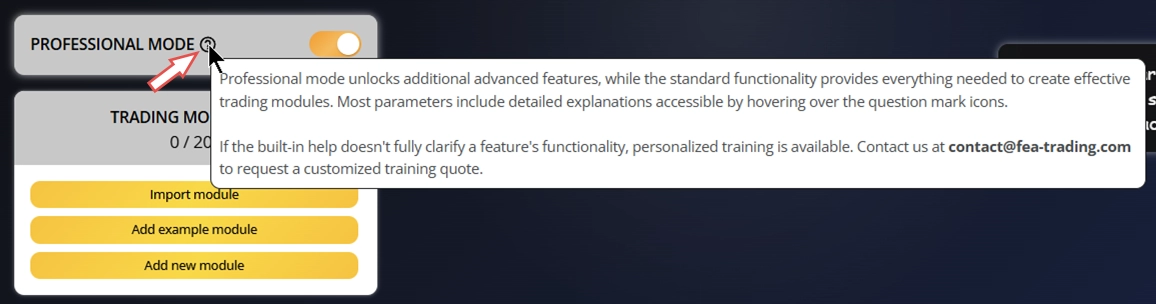
The Expert Advisor Builder includes integrated help. Hover over any question mark icon to view details about a specific setting.
Installation
The executable installer automatically configures the Trading Module Interpreter needed for seamless operation.
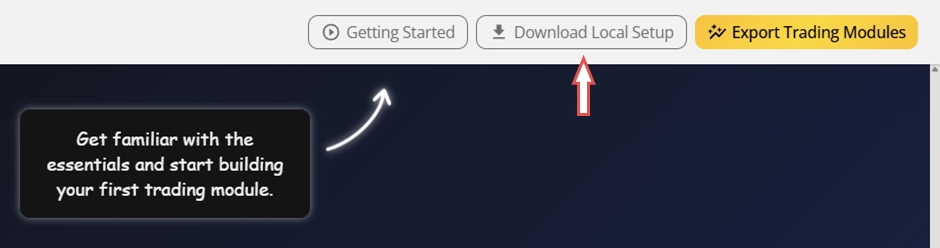
Step 1: Download the installer
Navigate to the Expert Advisor Builder web application and click Download Local Setup in the top right corner. Save the installer to your computer. If any browser or Windows security warnings appear, simply dismiss them. A dialog window will guide you through that process.
Step 2: Run the installation
Double-click the installer to launch it. The installation screen may take a few seconds to appear. Once it does, the setup wizard will:
- Detect all MetaTrader 4 and MetaTrader 5 installations on your system
- Install the Trading Module Interpreter expert advisor
- Configure necessary additional files (Universal angles, Universal indicators, Universal oscillators, Chart template)
- Set up required initial folder structures
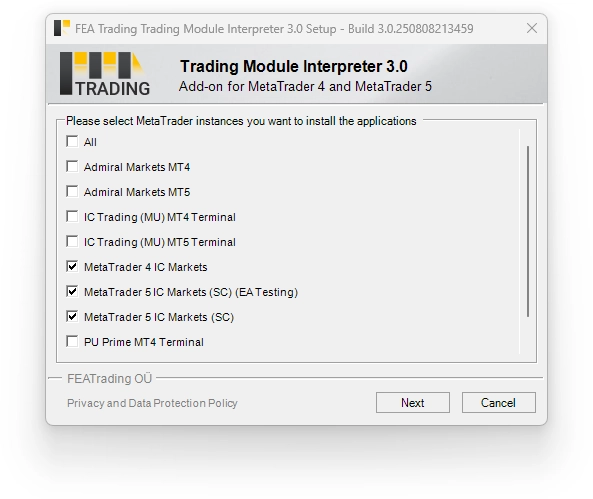
The installation typically completes in less than a minute.
Step 3: Configure MetaTrader settings
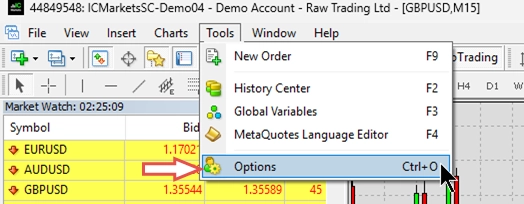
As the Trading Module Interpreter expert advisor interacts with a backend server, you must adjust some settings in your MetaTrader. Please open the instance of MetaTrader you chose during installation and go to the Options menu.
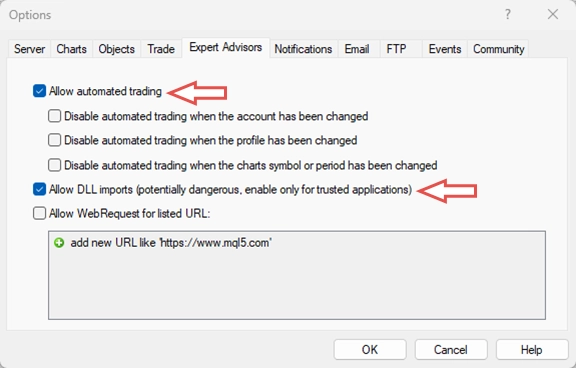
Go to the Expert Advisors tab and enable Allow automated trading and Allow DLL imports. The application relies on native Windows libraries to connect with a news backend server and deliver real-time news data to your trading systems.
Your MetaTrader is now ready to execute sophisticated trading strategies created with the Expert Advisor Builder.
Build your first trading module
First module: MACD Long trading
Let’s create your first trading module using the Expert Advisor Builder web application. We’ll begin with a manual configuration.
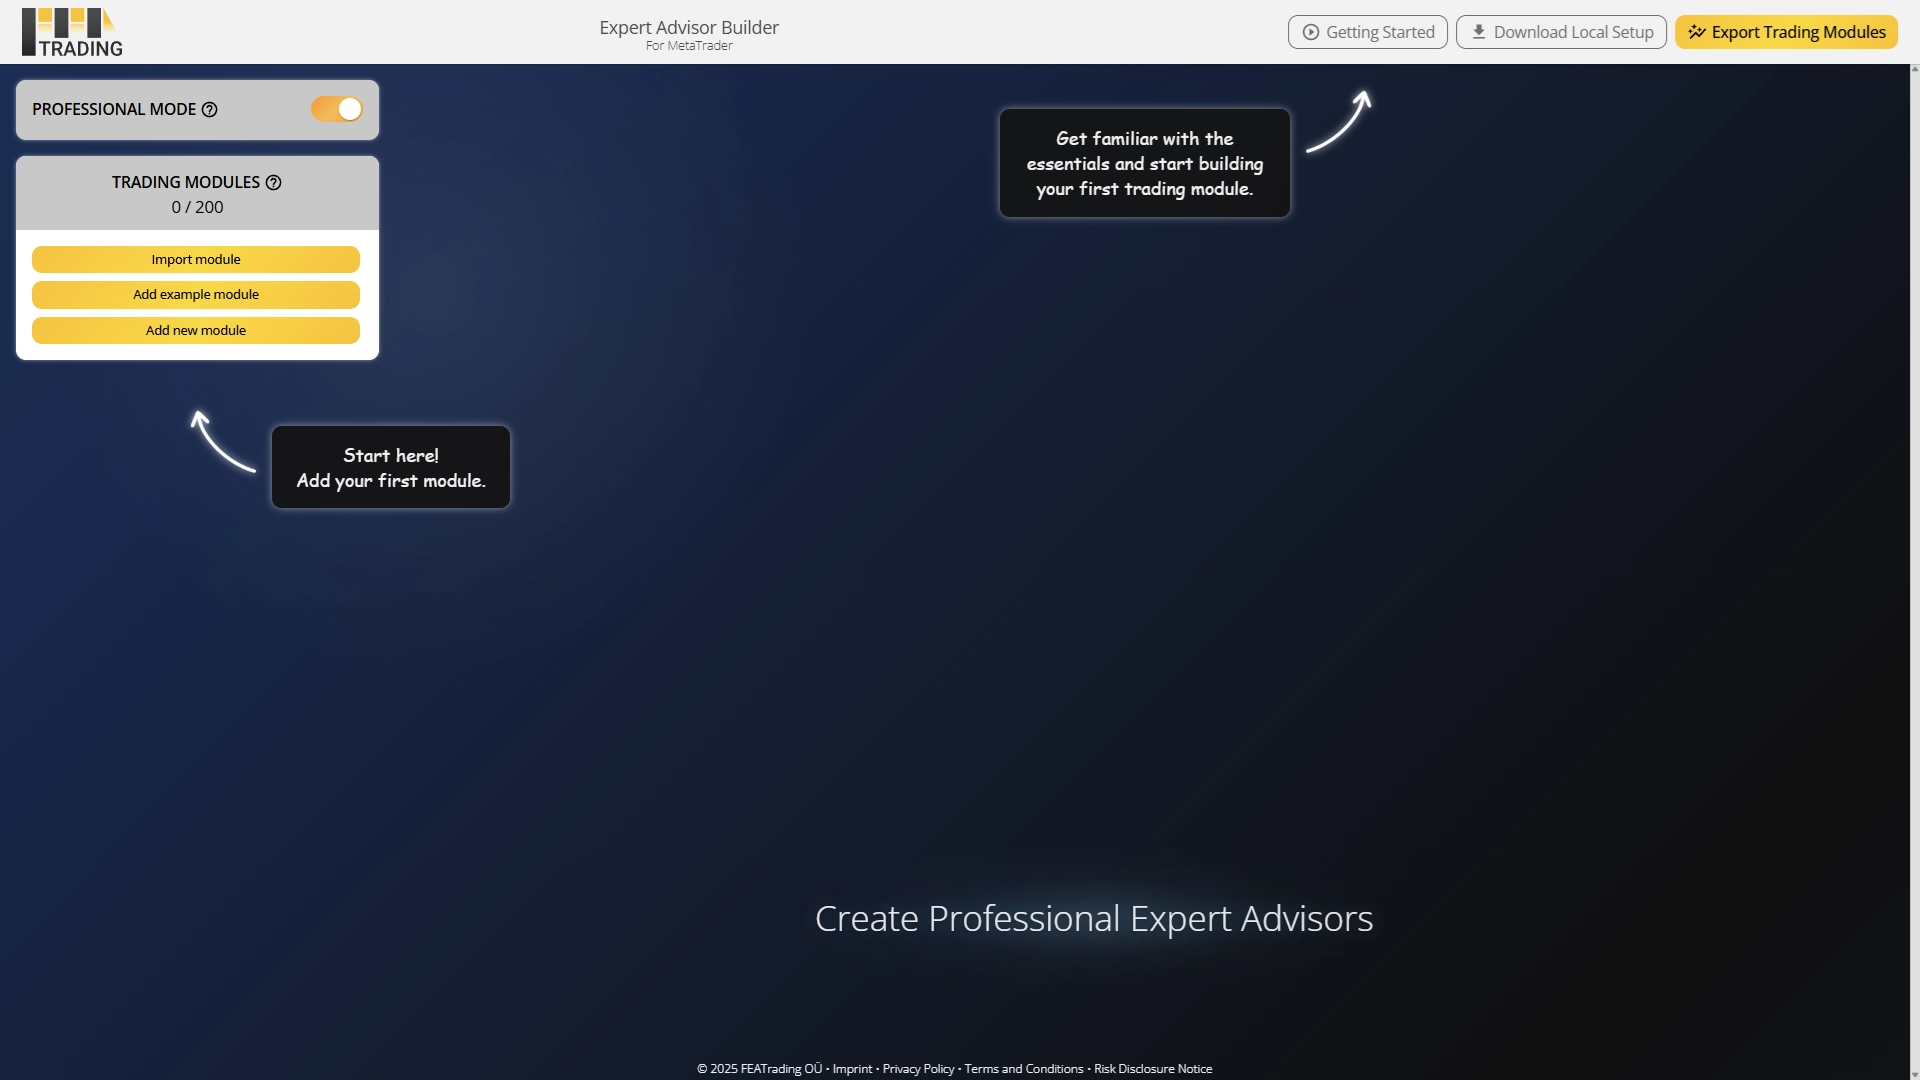
Step 1: Open the Expert Advisor Builder web application
No login is required, and your latest progress is automatically saved. When you reopen the application, your work will be restored, so reloading or closing the web app won’t erase anything.
Step 2: Add a new module
Click Add new module to create a blank trading module. The Expert Advisor Builder follows the principle that a blank trading module comes preconfigured with optimal default values for every component. This means you only need to adjust the differential settings, rather than building everything from scratch. The result: maximum output with minimal effort.
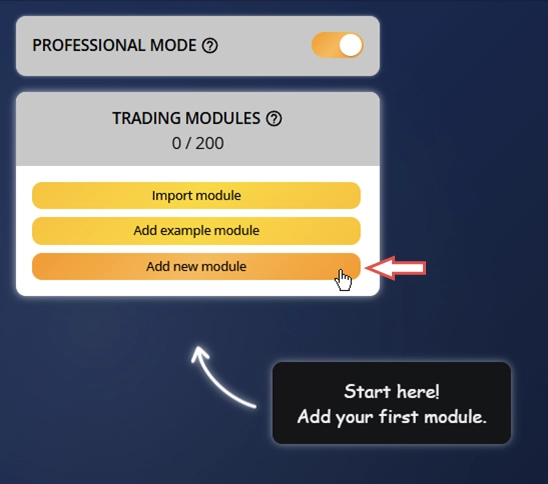
You’ll see a few helpful tips already on screen, they’ll point you toward the next steps.
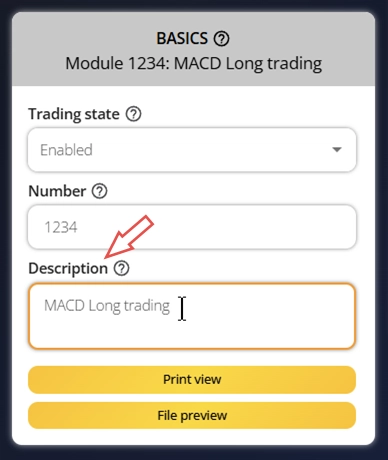
Step 3: Configure the module basics
Below the newly added module, a configuration window will appear. Please use it to set the following parameters:
- Trading state = Enabled
- Number = 1234
- Description = MACD Long trading
Step 4: Configure the trade basics
Access the Trade Basics component to view your current settings. You'll find a summary of all configured values displayed in this section. The configuration menu is located at the top, just above the parameter overview. Every component in the Expert Advisor Builder uses this same layout - a settings menu above and a parameter display below. To modify these settings, click on Configure trade basics to open the input window.
Please ensure that the following parameter is configured properly, press Save and Close the dialog:
- Operation type = Long

Step 5: Add a standard deviation indicator
To set the stop loss level, we'll use the standard deviation oscillator value. First, we need to add and set up an indicator so its value can be used by other components. Go to the Signal Generation section and then choose Indicators.

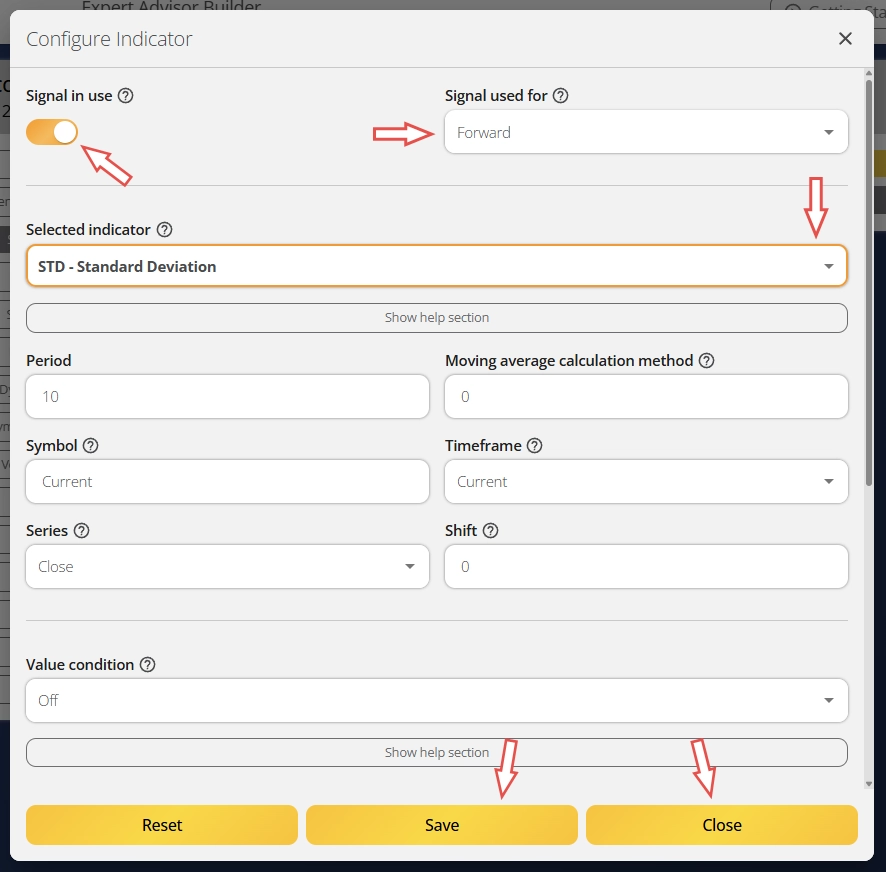
Click the Add new indicator button. This creates a new indicator and immediately opens its configuration menu. Change the following parameter, press Save and Close the dialog:
- Signal in use = On
- Signal used for = Forward
- Selected indicator = STD
- Draw in chart = Off
- Forward adjustment = 3.50
This indicator serves only one purpose: setting the initial stop loss. It won't participate in generating trade signals or influence when trades open or close. We will need this indicator later.
Step 6: Set up the MACD signal
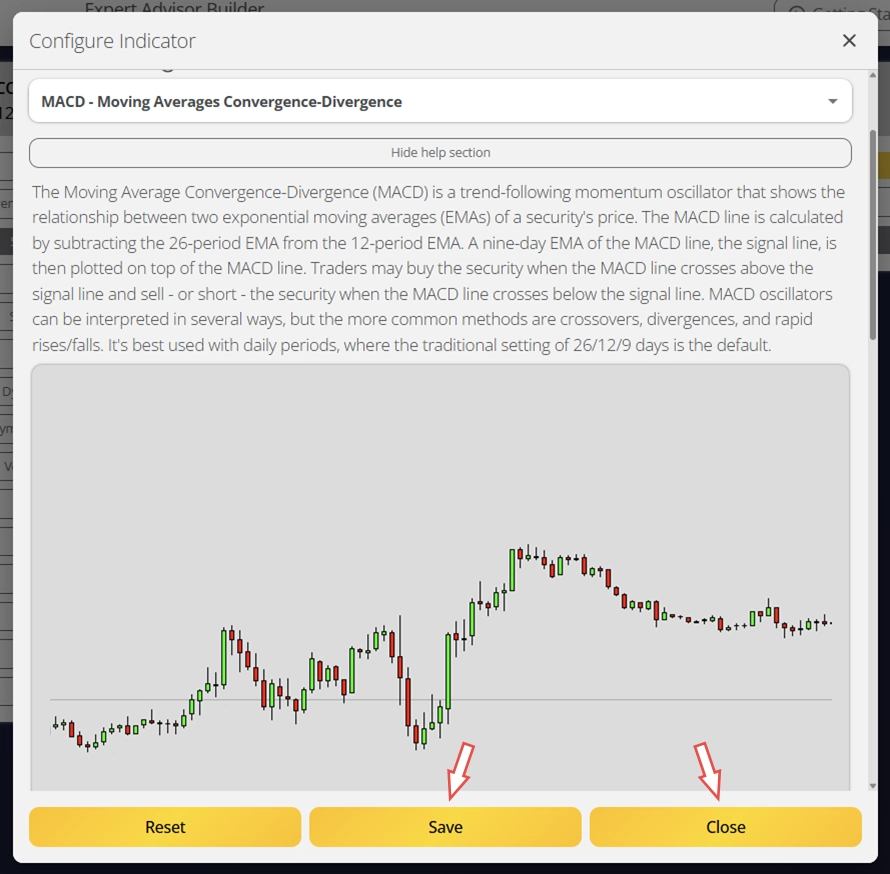
A trading module needs to identify when to enter the market. We'll use the MACD oscillator with its two standard lines to generate trading signals. Add another indicator by clicking Add new indicator once more. Then adjust these parameters, press Save and Close the dialog:
- Signal in use = On
- Signal used for = Entry
- Selected indicator = MACD
- Line index = Main line
- Draw in chart = On
- Drawing slot = 1
You'll notice we've only set up the MACD's Main line. Each indicator component handles just one line at a time. To include the MACD's Signal line, we need another indicator component. Since both use the same MACD system, you can simply copy the existing one. Click the three dots next to the current MACD indicator and choose Duplicate. This creates an exact copy with identical settings. Now you just need to change the Used line parameter to Signal line. Make sure the new indicator has these settings, press Save and Close the dialog:
- Signal in use = On
- Signal used for = Entry
- Selected indicator = MACD
- Line index = Signal line
- Draw in chart = On
- Drawing slot = 1

Now we'll connect the two MACD lines we configured. Navigate to the Indicator Combinations component, located directly below the Indicators component you just used.

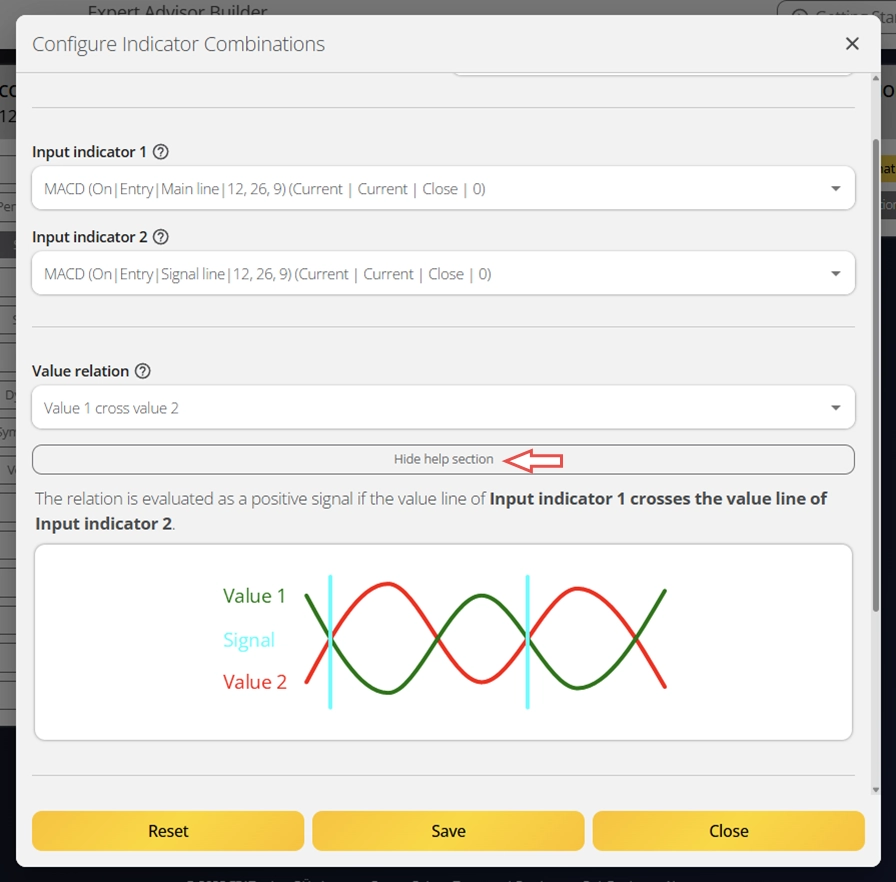
Click Add new indicator combination to create a relationship between the two indicator lines. This opens another configuration window. Set the following options, press Save and Close the dialog:
- Signal in use = On
- Signal used for = Entry
- Input indicator 1 = MACD (Main line)
- Input indicator 2 = MACD (Signal line)
- Value relation = Value 1 cross value 2
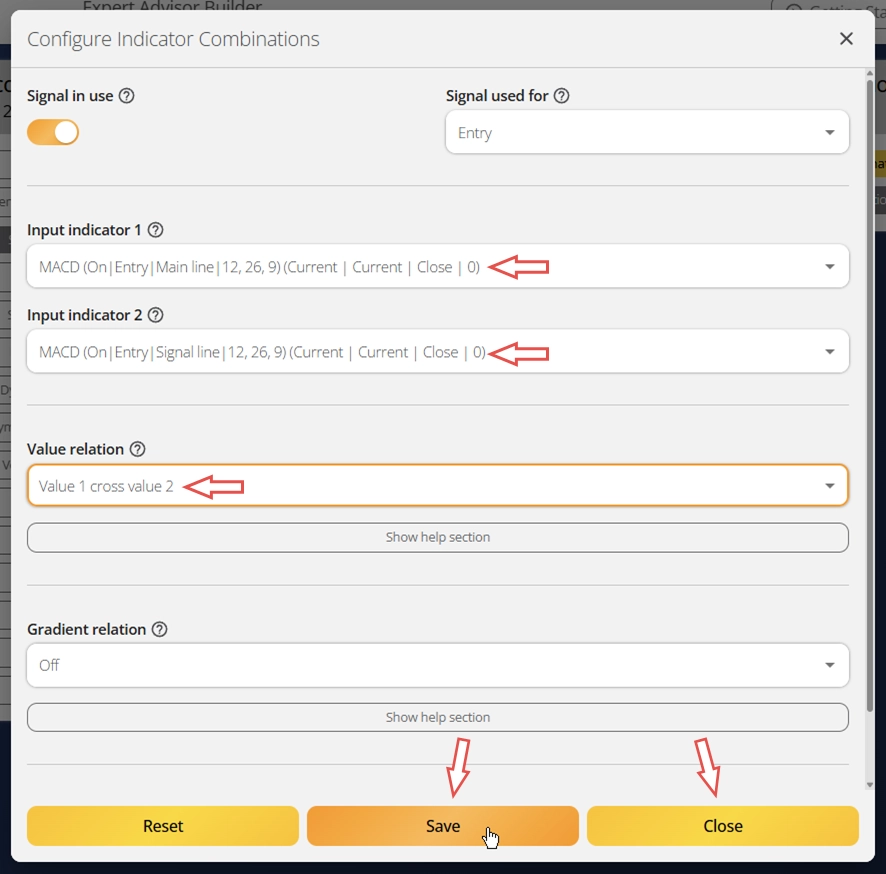
Some parameters include help sections that provide additional details about specific features. You can expand these sections to learn more about each setting. Look at the image below to understand, for example, what Value 1 cross value 2 actually means.
Excellent work! You've created your first trading signal using the MACD oscillator and both of its lines. As you can see, the system supports up to 50 indicators and multiple indicator combinations, giving you the flexibility to build any type of trading strategy. Beyond indicators, you can also generate signals from an advanced chart analyzer, news events, candle pattern scanner, chart pattern detector, and Fibonacci pattern finder. These tools provide nearly endless possibilities for strategy creation.
Step 7: Configure the initial stop loss
Remember the standard deviation (STD) indicator we created earlier with Signal used for = Forward? Now we'll put it to use. Select the Initial Stop Loss component and click Configure initial stop loss to open the settings menu.
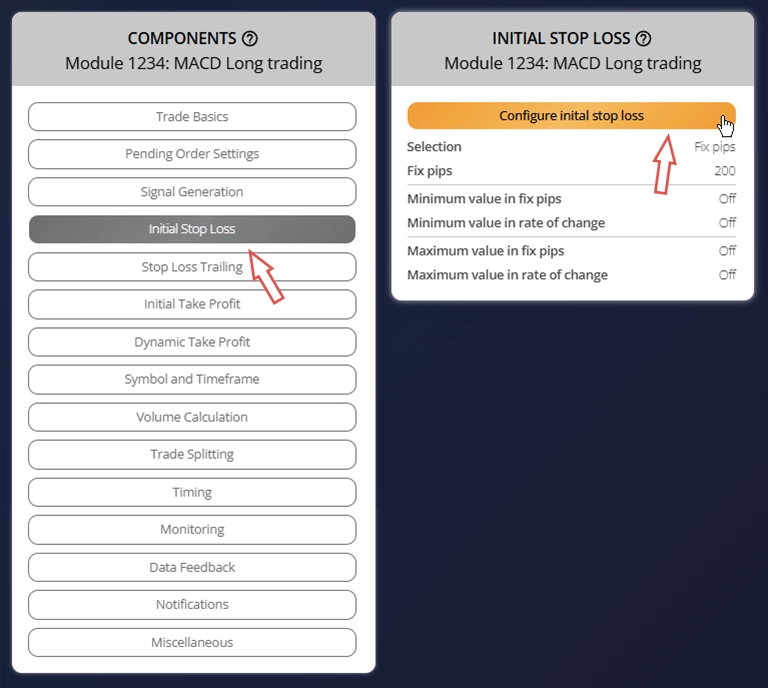
Make sure these parameters are set and press Save and Close the dialog:
- Selection = Indicator
- Used indicator = STD
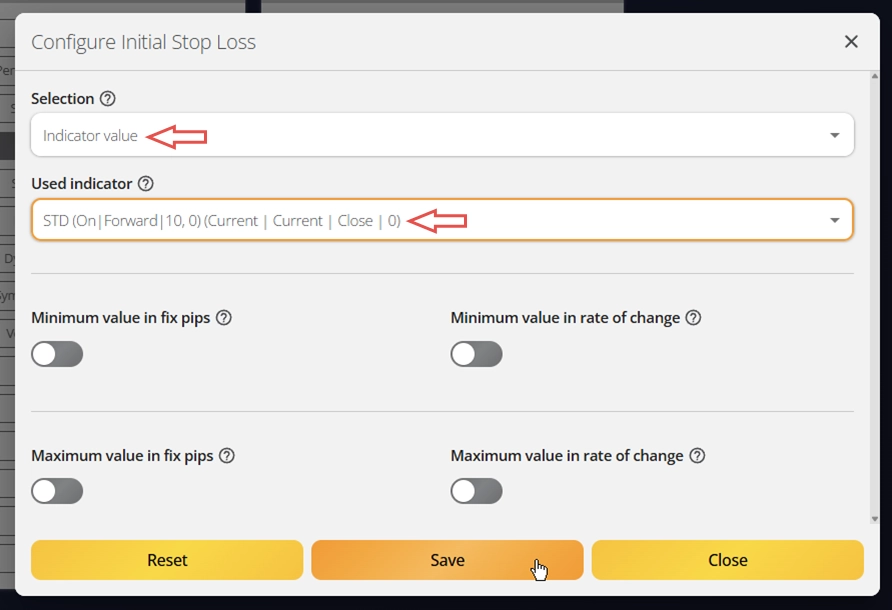
You'll see that only indicators set to Signal used for = Forward appear in the selection list. This means the indicator's calculated value gets passed along for use in other components. To modify this value, use the Forward adjustment parameter. In this case, a higher Forward adjustment places the initial stop loss farther from the entry price.
Step 8: Configure the initial take profit
Finally, let's set up the initial take profit level for this trading module. Open the Initial Take Profit component and click Configure initial take profit.
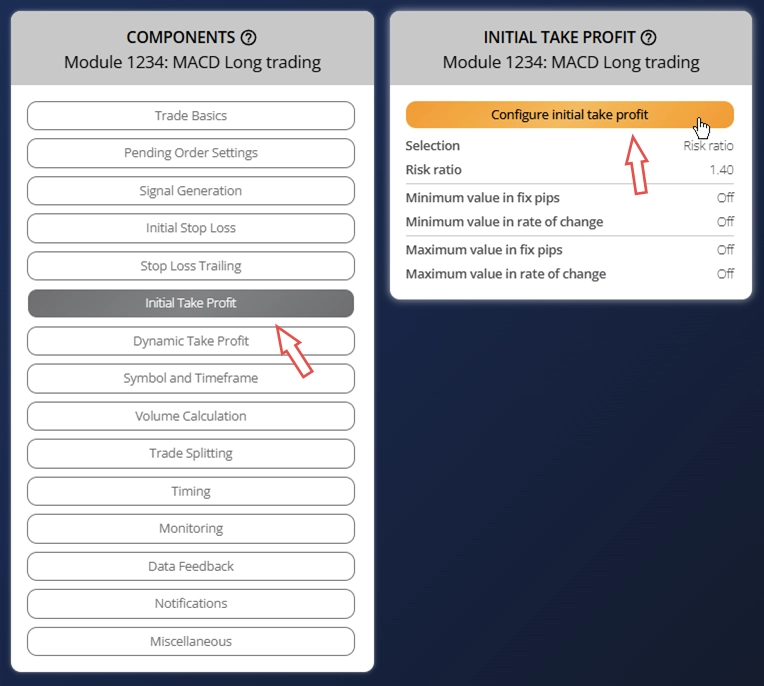
Make sure these parameters are configured, press Save and Close the dialog:
- Selection = Risk ratio
- Used indicator = 1.40

The system uses a risk ratio of 1.40 for the take profit level, meaning the potential profit target is 40% larger than the risk taken. This creates a favorable risk-reward balance for long-term profitability.
Add an example module
Second module: MACD Short trading
For the second module, we’ll use the example import feature to streamline the process. The Expert Advisor Builder includes a wide range of useful examples, each accompanied by a detailed explanation and step-by-step guide. Some examples are designed to help you understand basic settings, while others serve as solid starting points for developing a robust trading strategy.
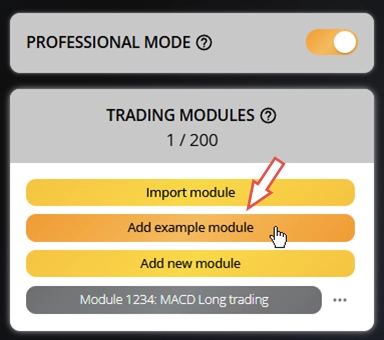
Step 1: Open the Examples menu
On the far left side of the main window, click Add example module. This opens a dialog displaying a list of pre-built example modules. Each example includes a brief description, its configuration parameters, and a sample chart image showing the expected output. Take your time to explore each example thoroughly.
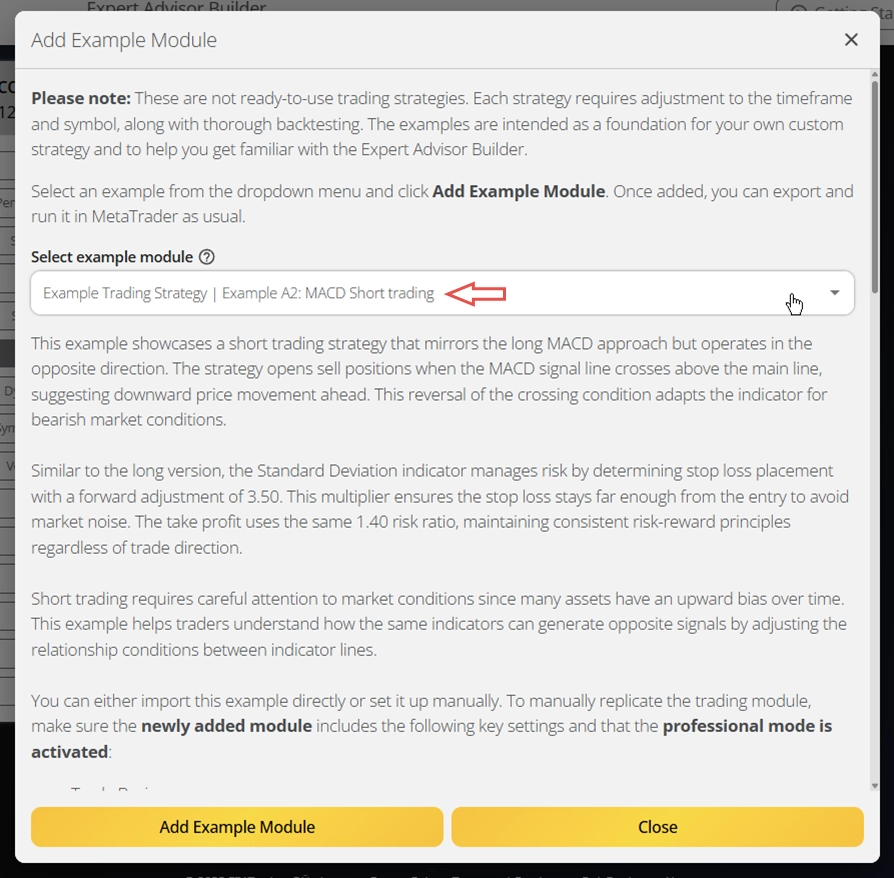
Step 2: Choose an example from the list
Please select Example Trading Strategy | Example A2: MACD Short trading. This module complements the MACD Long trading module you manually configured in the previous section. The parameters are nearly identical, except this module opens short trades and combines the MACD signal and main lines in reverse order.
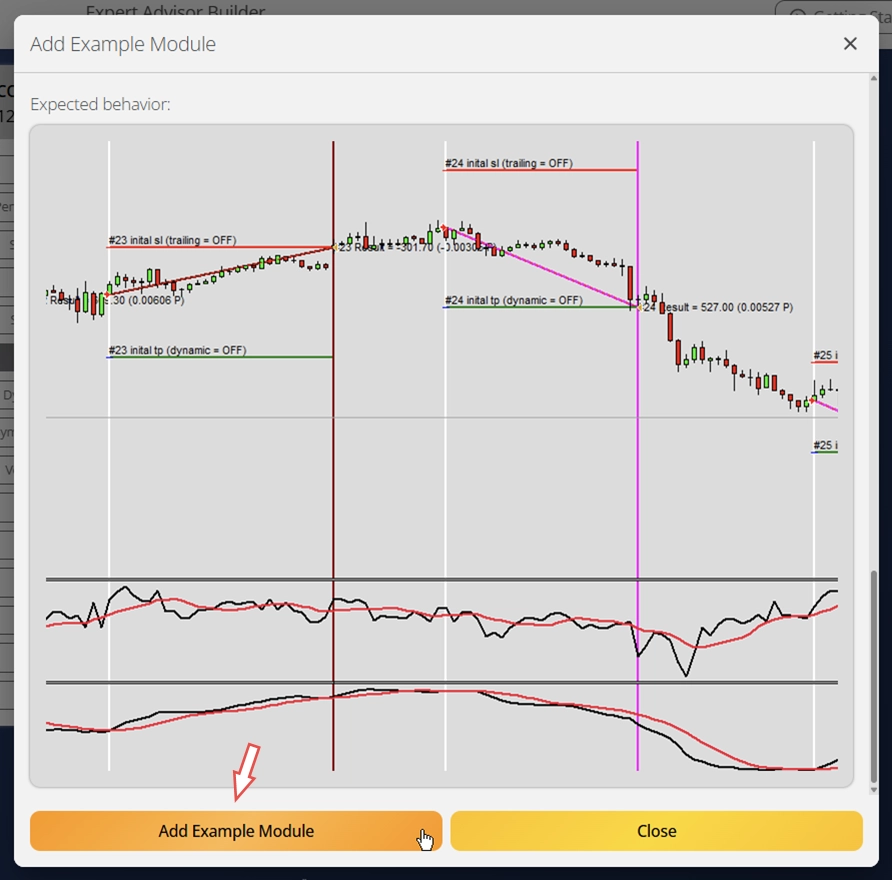
Step 3: Import the selected module and review its configuration
Finally, complete the import by clicking Add Example Module. This creates a new trading module with all the settings already configured according to the example description.
Setup complete, efficient and fast, just as it should be. Let’s move on to the next step.
Export trading modules
After creating your trading modules, exporting and deploying them is simple. You can either export all configured modules together or export them one by one. When exporting all modules at once, they're packaged into a ZIP file. When exporting individually, each module downloads as a separate text file.
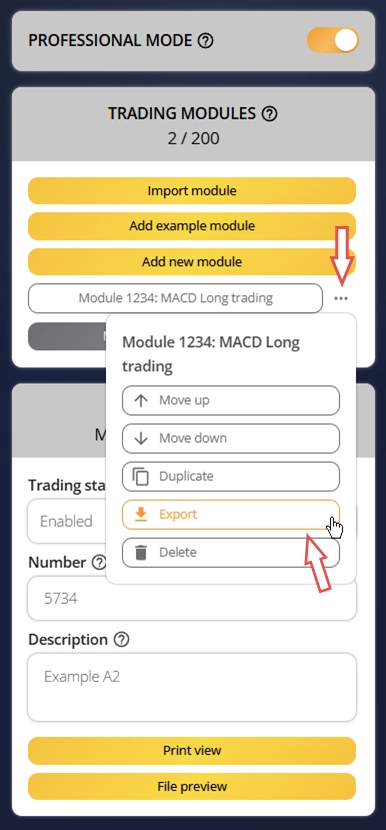
Step 1: Export the configured trading modules
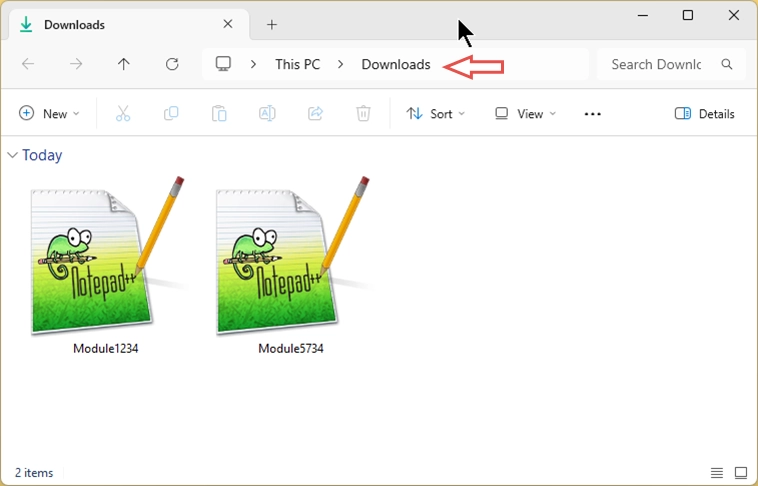
Open the context menu by clicking the three dots next to the module in the modules list, then select Export. This downloads a file named with the module number (for example, Module1234.txt). Keep the original filename, it's essential that these names remain static and unique. Export both modules using this method.
After this is done, you can locate the modules in your standard download folder.
Step 2: Move the modules to the Trading Module Interpreter's input folder
During installation, a default input folder was created in the Trading Module Interpreter's application directory. You can find this folder in several ways:
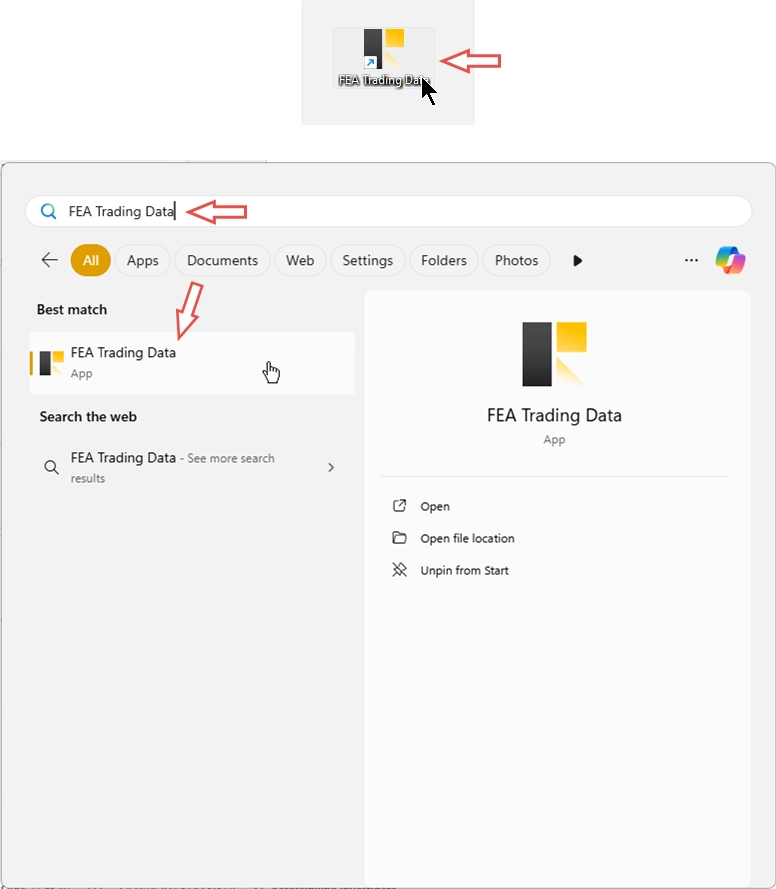
- Use the FEA Trading Data shortcut on your desktop and navigate to FEA Trading Data\Trading Module Interpreter 3.0\default\Configuration
- Open the Windows Start menu, search for FEA Trading Data, and open that folder. Then navigate to FEA Trading Data\Trading Module Interpreter 3.0\default\Configuration
- Open Windows Explorer and paste this path into the address bar: %AppData%\MetaQuotes\Terminal\Common\Files\FEA Trading Data\Trading Module Interpreter 3.0\default\Configuration
Any of these methods will show you the same empty folder. The Trading Module Interpreter only reads files placed in this specific folder. Move both downloaded module files into this location.

You'll notice the path includes a folder named default. This is the profile folder. You can create multiple profiles and choose which one to use when starting the Trading Module Interpreter expert advisor. This feature is especially useful for organizing different trading systems for various purposes, for example, one profile for testing strategies and another for live trading. In all cases, the module files must always be placed in a subfolder named Configuration.
For now, we'll continue using the default folder.
Test your trading strategy
Every trading strategy needs thorough testing with quality tick data. Strategies rarely work profitably without optimization. We've prepared an article explaining proper strategy testing methods. If you need high-quality tick data, explore our MT5 Tick Data solution. You can download accurate tick data with up to 20 years of historical records.
Testing your strategies before live deployment is essential. We'll use the standard MetaTrader strategy tester, which has proven to be one of the best tools for backtesting. We strongly recommend using the MetaTrader 5 strategy tester because it performs tick-accurate backtests. However, the MetaTrader 4 strategy tester remains useful since it's simpler and faster, especially in visual testing mode.
Step 1: Open the MetaTrader platform where you installed the Trading Module Interpreter
Step 2: Set up the Strategy Tester
For this getting started guide, we're using the MetaTrader 4 strategy tester. The process in MetaTrader 5 is nearly identical.
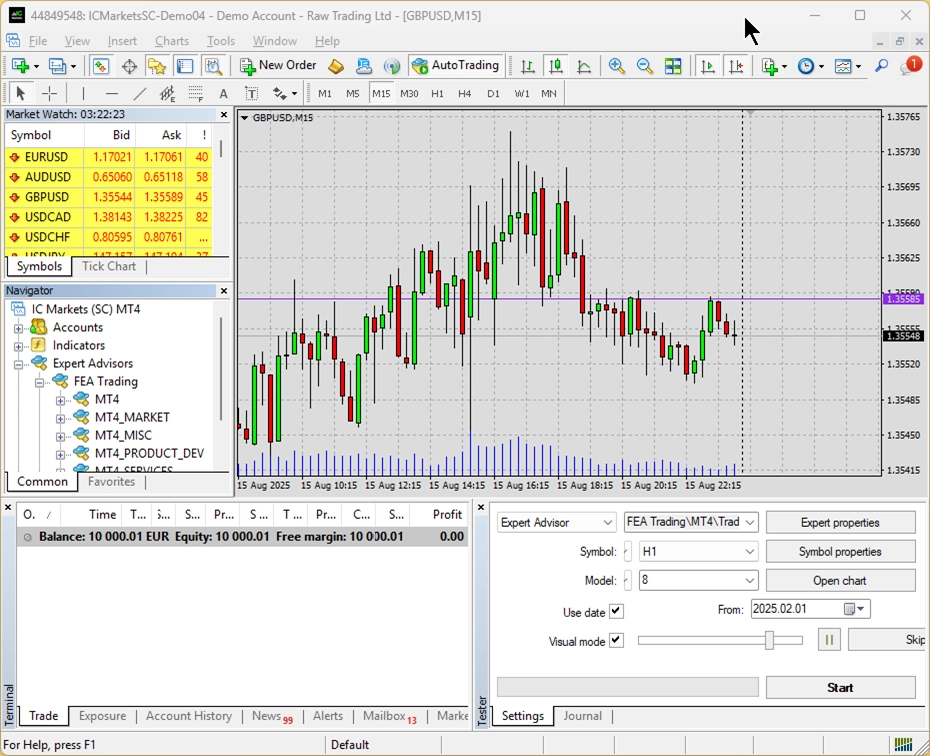
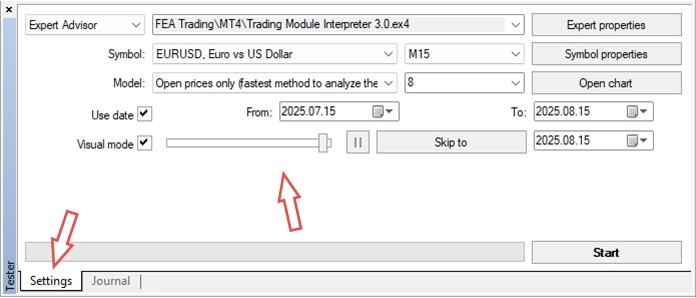
Make sure the strategy tester window is open. You can access it through View → Strategy Tester or by pressing Ctrl+R. In the strategy tester window, go to the Settings tab. Configure these options:
- Expert Advisor: FEA Trading\MT4\Trading Module Interpreter 3.0.ex4
- Symbol: EURUSD
- Period: M15
- Spread: 8
- Model: Open price only
- Use date: Enabled
- Date range (From/To): Previous 4 weeks
- Visual mode: Enabled
- Optimization: Disabled
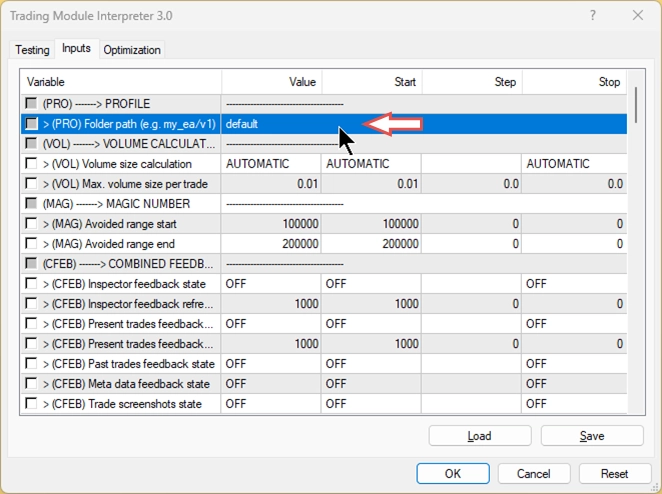
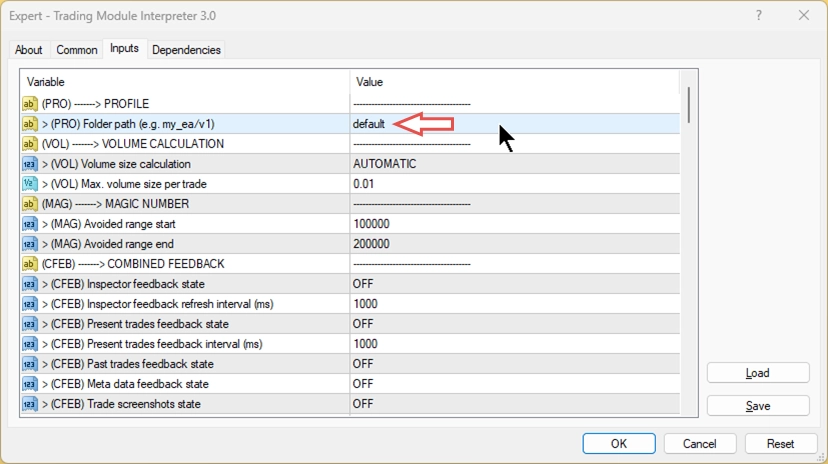
Let's examine the Expert Properties to view the inputs. Generally, all parameters needed to define the trading logic come from the trading module files. You don't need to modify any inputs at this point. However, under > (PRO) Folder path (e.g. my_eas/v1), you can see default is configured. As explained earlier, this tells the system to use trading modules from the default folder. You could change this to point to any other profile if needed. A complete explanation of all input parameters and how to optimize trading modules is available in the Trading Module Interpreter's user manual.
Step 3: Start the strategy test
Close this window and click Start to run the strategy test. After a brief moment, the test begins and displays a screen similar to the following:
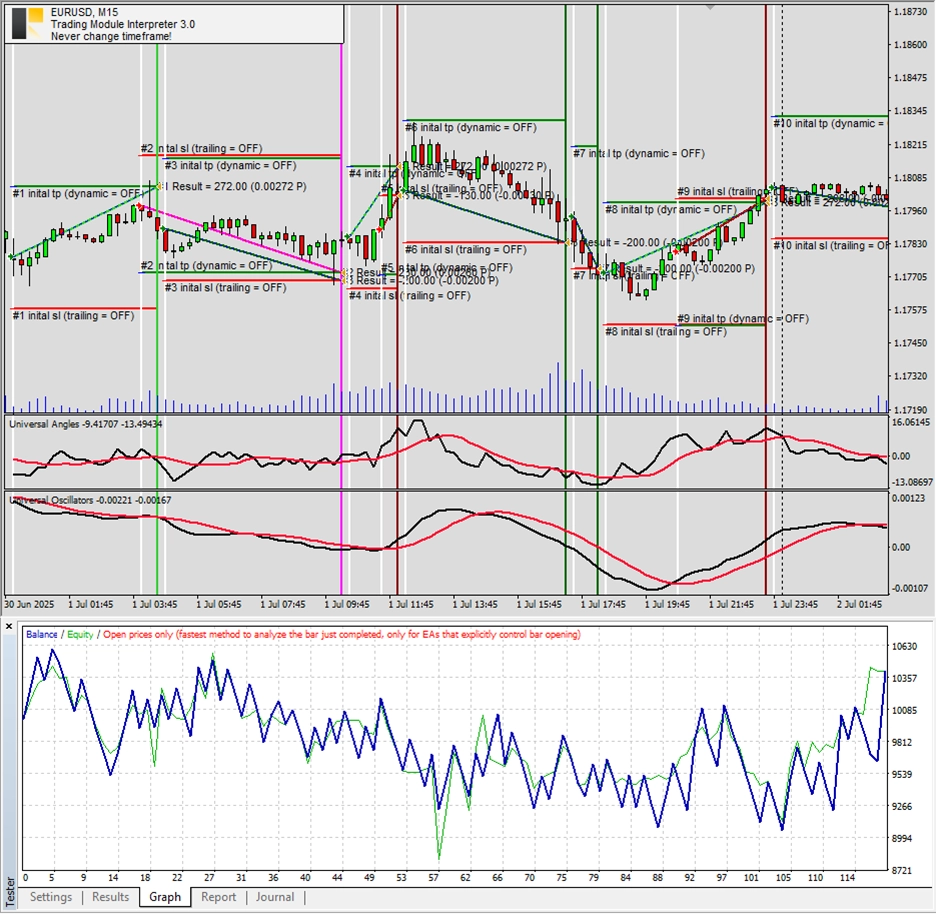
Congratulations! You've successfully created and tested your first automated trading system without writing any code!
Activate on live chart
We strongly recommend completing the following steps using a demo account first. This allows you to familiarize yourself with the process in a risk-free environment.
You may wish to run the trading system on a live chart rather than solely in tester mode. Please keep in mind that the strategy outlined in this guide is intended for demonstration purposes only and is unlikely to be profitable in its current form. Profitable strategies require thorough testing and adaptation, which has not yet been performed in this case. Nevertheless, let’s proceed to activate the trading system on a live chart and observe its behavior.
Step 1: Preparing the live chart
Ensure that your account settings allow automated trading before proceeding.

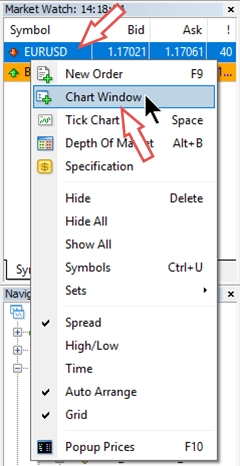
Next, open a new EURUSD chart with a 15-minute (M15) timeframe.
Step 2: Activate the Trading Module Interpreter
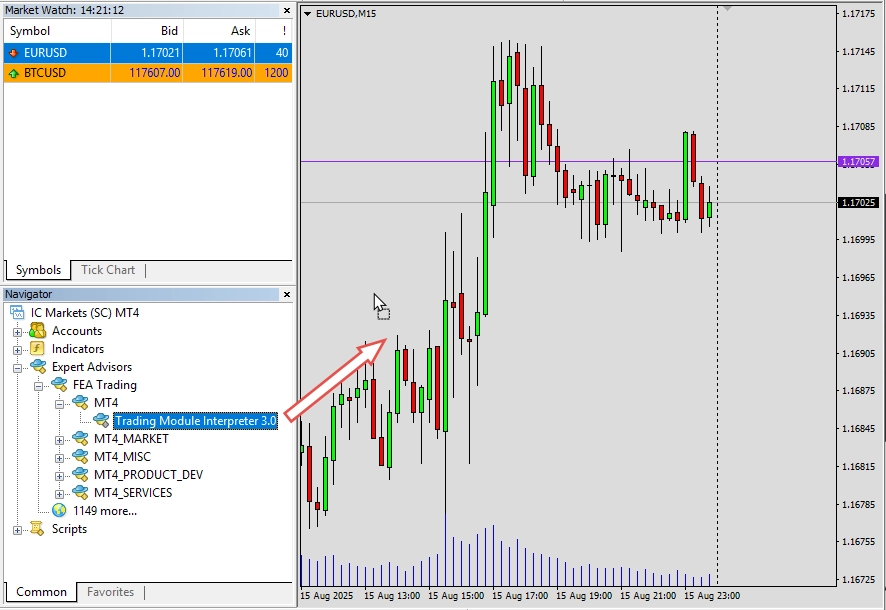
From the Navigator panel, drag the Trading Module Interpreter onto your EURUSD M15 chart. You’ll find it under:
FEA Trading\MT4\Trading Module Interpreter 3.0.ex4
The settings dialog should appear automatically. In it, confirm that the folder path points to your folder with the tested modules, this should be the default folder for the demo. Once everything looks good, click OK to start. If you see a smiley face in the top-right corner of the chart, you’re all set!
Step 3: Confirm your trading modules are loaded
In the terminal view (View → Terminal), navigate to the Experts tab. Here you can see that both modules placed in the default folder have been loaded and activated.
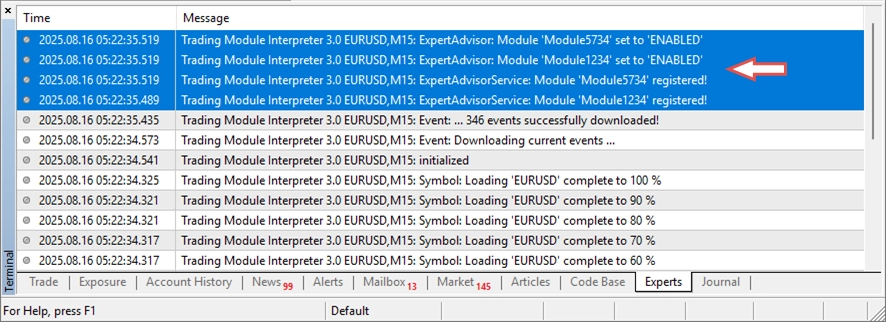
Your automated trading system is now live!
Optional Step: Change the trading status
As mentioned earlier, you can change a module's trading status even while it's running. To do this, open one of the trading module files and modify the second line, then follow the instructions provided within the module file. In the example below, we've changed the module's trading state. You'll see this change immediately reflected in the Experts tab.
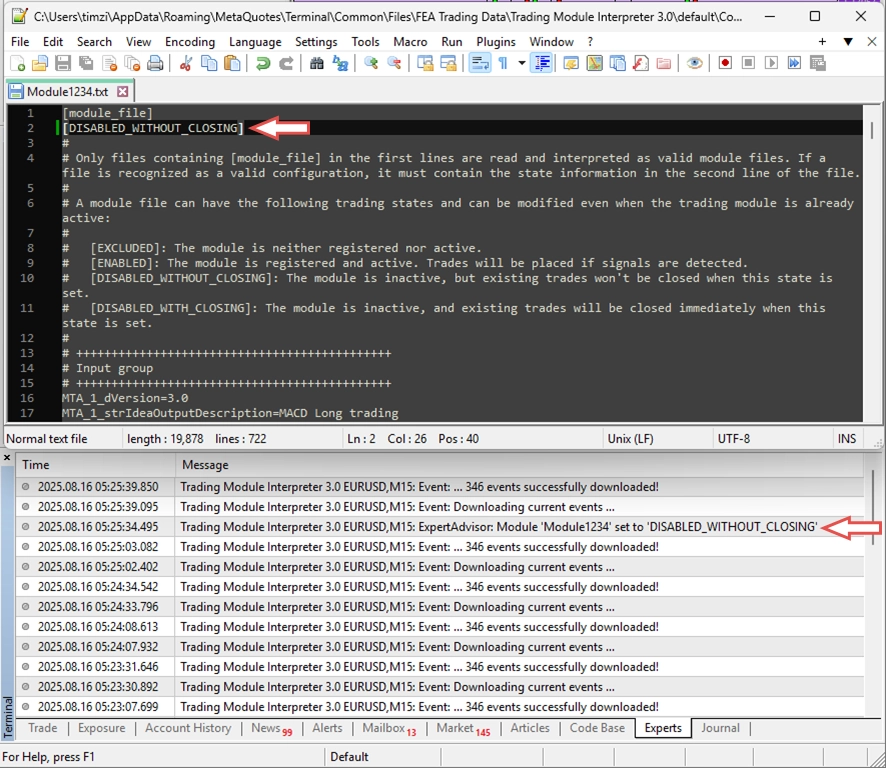
While a module is running, you can change its trading state at any time.
Iterative modifications
Many automated trading strategies require occasional adjustments. You have two options for making changes:
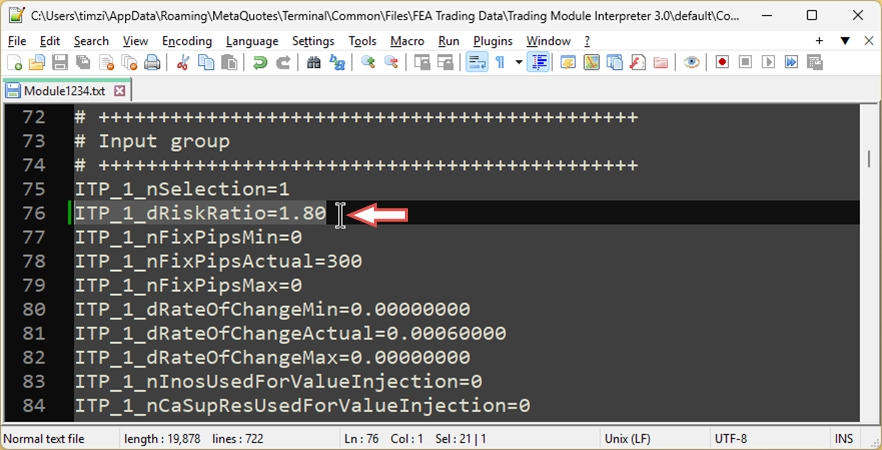
Option 1: Manual file editing
You can directly modify the trading module files using a text editor. Locate the parameter you wish to change and update its value. This method requires a deep understanding of the module file structure. Please refer to the user manual for detailed guidance.
To replace and reload all parameters during runtime, first move the module out of the input folder, then add the newer version. Simply "replacing" the file won't work due to security constraints. If the module isn't running, you can simply adjust the settings and save the text file.
Option 2: Using the Expert Advisor Builder
Reimport the trading module into the Expert Advisor Builder, make your changes within the interface, and then export the updated module.
For this guide, we’ll focus on Option 2, editing modules via the Expert Advisor Builder.
Step 1: Import the Trading Module
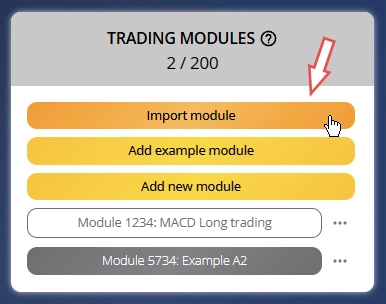
To begin, open the Expert Advisor Builder and either click on Import module or drag and drop one or more module files directly into the web interface.
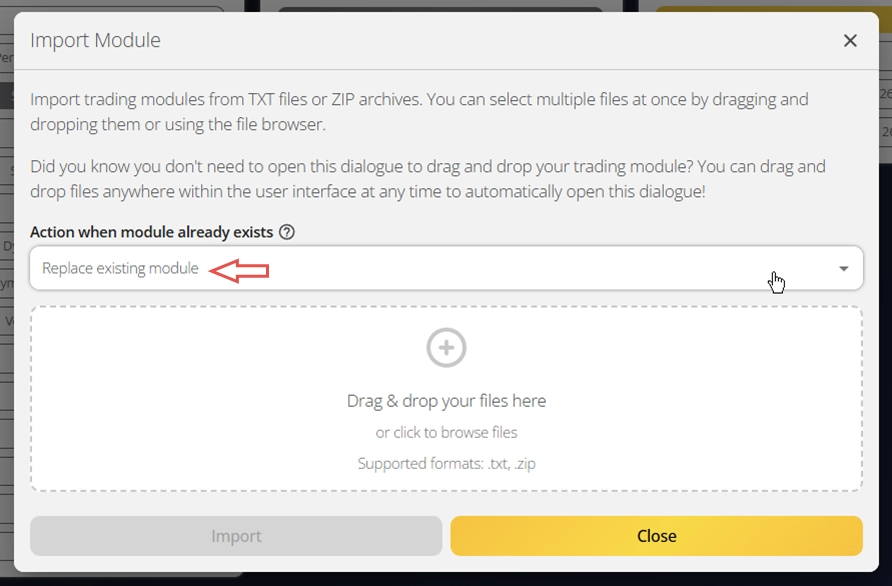
This action will automatically trigger the import dialog. By default, the system is set to skip any module that already exists. However, in this case, you’ll want to override that behavior by selecting the option to replace the existing module. This ensures that the module you’re about to modify is the one currently in use, maintaining consistency and avoiding version conflicts. Set the following parameter:
- Action when module already exists: Replace existing module
Step 2: Load and modify module settings
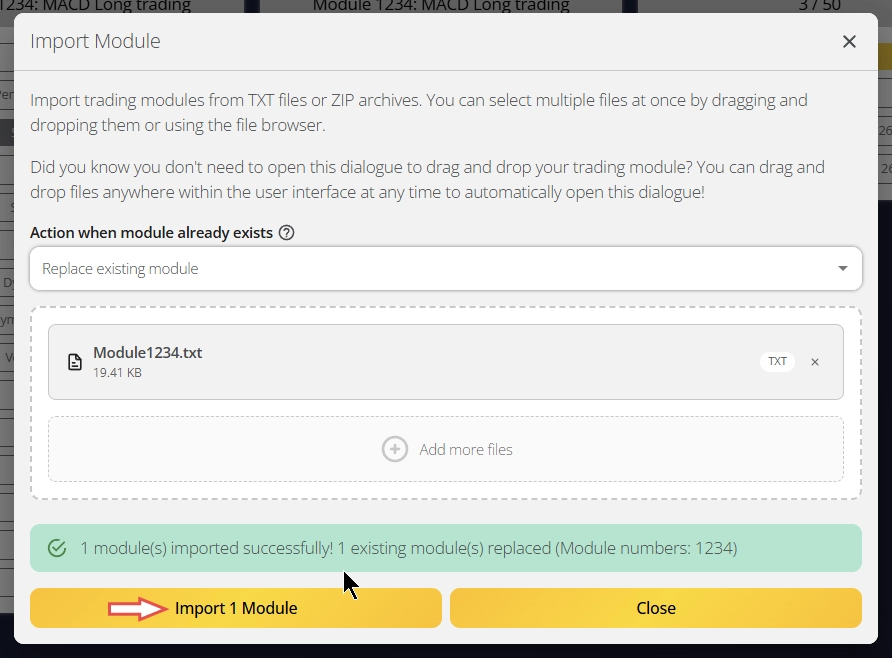
Next, drag and drop your module files from the designated modules folder into the interface. The system will instantly load all relevant settings, giving you immediate access to the module’s current configuration. From this point forward, the workflow essentially resets, allowing you to make any necessary adjustments. You can now modify the parameters according to your requirements, tailoring the module to reflect the desired trading logic or behavior.
Step 3: Export and apply the updated trading system
Once your changes are complete, export the updated trading module. Replace the existing file in the profile folder with this newly exported version to ensure the system uses your latest configuration. Finally, restart the Trading Module Interpreter. This step activates the updated module and applies your changes, allowing the trading environment to operate with the revised settings.
To replace and reload module files during runtime, first move the module out of the input folder, then add the newer version. Simply "replacing" the file won't work due to security constraints.
Summary
You've successfully mastered the Trading Module Interpreter workflow - from creating trading strategies in the Expert Advisor Builder to executing them on MetaTrader charts. This revolutionary system empowers you to build sophisticated automated trading systems without programming knowledge.
Subscribe
Your 14-day evaluation period includes full access to both demo and live trading capabilities, allowing you to thoroughly test the platform's potential. Experience the complete feature set, explore the extensive example library, and develop your own profitable strategies.
Subscribe now to continue building your automated trading portfolio with professional-grade tools.